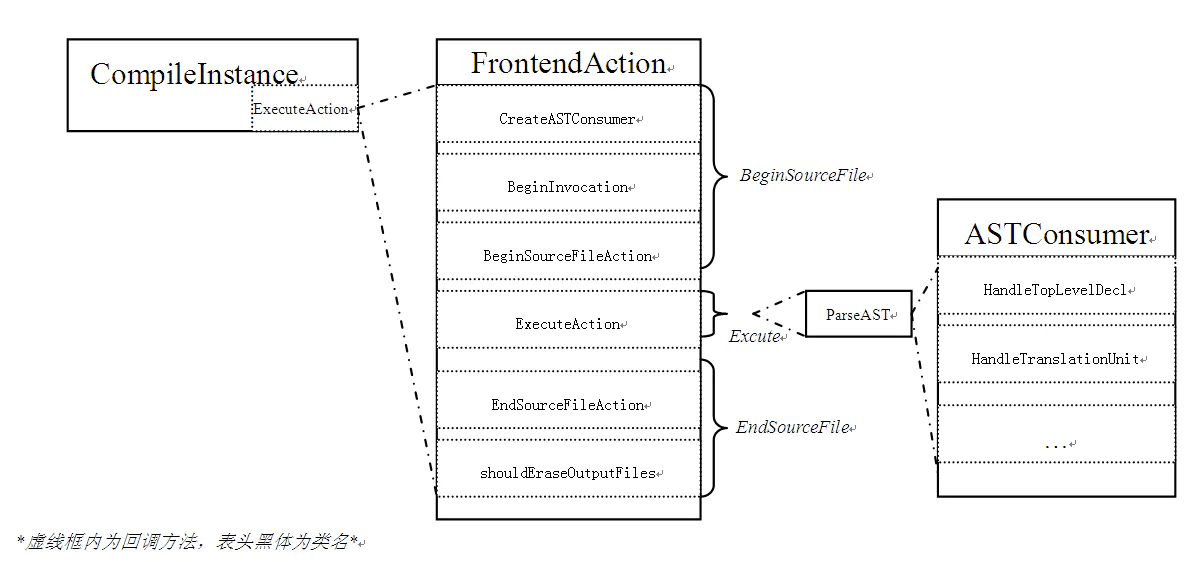
国科大研究生的编译程序高级课程的第一个作业,基于libclang写一个简单的(不是)C语言解释器,
Github仓库
例如给如下的C文件:
1
2
3
4
5
6
7
8
9
10
11
extern int GET () ;extern void * MALLOC (int ) ;extern void FREE (void *) ;extern void PRINT (int ) ;int main () {int a;100 ;
那么最后解释器需要输出100,为了得到验证用的对比数据,使用gcc编译的时候在编译的时候链接一个buildin.c来实现如上的四个函数:
1 2 3 4 5 6 7 8 9 10 11 12 13 14 15 16 #include <malloc.h> int GET () {int x;scanf ("%d" , &x);return x;void * MALLOC (int sz) {return malloc (sz);void FREE (void * ptr) {free (ptr);void PRINT (int x) {printf ("%d" , x);
这样,在编译的时候:
1 gcc test00.c buildin.c -o test00.out
项目的名称叫做ast-interpreter,网上也有不少示例代码,但是蛋疼的是老师讲LLVM很少,实现起来要读很多LLVM的源代码,着实有些浪费时间,main函数的内容很简单。
1
2
3
4
5
6
int main (int argc, char **argv) if (argc > 1 ) {runToolOnCode (std::unique_ptr <clang::FrontendAction>(new InterpreterClassAction), argv[1 ]);return 0 ;
对于runToolonCode的函数介绍:
1 2 3 4 5 6 7 8 9 10 11 12 13 bool runToolOnCode (std::unique_ptr<FrontendAction> ToolAction, const Twine &Code, const Twine &FileName = "input.cc" , std::shared_ptr<PCHContainerOperations> PCHContainerOps = std::make_shared<PCHContainerOperations>())
显然,第一个参数是FrontendAction、第二个参数是输入的源代码字符串,其余两个参数具有默认选项,第三个参数的意思是输入的源代码会在本地被映射的文件名,第四个参数适用来初始化PCH(Precompiled Headers。
关于Precompiled Headers技术,详见Clang的预编译:https://marvinsblog.net/post/2019-05-12-clang-pch/
总之,是一种将头文件预编译从而缩短编译时间的手段。
显然,我们需要关注的是FrontendAction是什么:
https://blog.csdn.net/qq_23599965/article/details/90696621
总共有三种类型的FrontendAction:
1 2 3 4 5 6 7 8 9 10 11 class ASTFrontendAction : public FrontendActionclass PreprocessorFrontendAction : public FrontendAction class WrapperFrontendAction : public FrontendAction
显然,我们遍历抽象语法树需要使用的是ASTFrontendAction。但除了这三个类,还有很多类是通过Frontend间接继承,例如PluginFrontEndAction、PreprocessorFrontendAction,CodeGenAction等。ASTFrontEndAction是用来为前端工具定义标准化的AST操作流程的。一个前端可以注册多个Action,然后在指定时刻轮询调用每一个Action的特定方法。这是一种抽象工厂的模式。
我们继承ASTFrontEndAction并重写CreateASTConsumer方法。这个方法由ClangTool在run的时候通过CompilerInstance调用,创建并返回给前端一个ASTConsumer。
1
2
3
4
5
6
7
8
class InterpreterClassAction : public ASTFrontendAction {public :virtual std::unique_ptr<clang::ASTConsumer> CreateASTConsumer ( clang::CompilerInstance &Compiler, llvm::StringRef InFile) return std::unique_ptr <clang::ASTConsumer>(new InterpreterConsumer (Compiler.getASTContext ()));
ASTConsumer是一个用于在一个 AST 上编写通用 actions 的接口,而不管 AST 是如何生成的。ASTConsumer提供了许多不同的入口点,但是对于我们的用例来说,唯一需要的入口点是HandleTranslationUnit,它是用ASTContext为翻译单元调用的。
1
2
3
4
5
6
7
8
9
10
11
12
13
14
15
16
17
18
19
class InterpreterConsumer : public ASTConsumer {public :explicit InterpreterConsumer (const ASTContext &context) : mEnv(), mVisitor(context, &mEnv) { virtual ~InterpreterConsumer () {}virtual void HandleTranslationUnit (clang::ASTContext &Context) getTranslationUnitDecl ();init (decl);getEntry ();VisitStmt (entry->getBody ());private :
因为源文件和全局标识符的信息不是存储在AST里的,而是在ASTContext中,所以我们的CONSUMER需要接受的参数是一个ASTContext,通过Compiler.getASTContext()得到。
在Consumer里,我们需要实例化一个Visitor帮助我们完成语法树的遍历,而Visitor一般有以下几种:
1
2
3
4
5
6
7
8
RecursiveASTVisitor.h
第一个RecursiveASTVisitor.h提供的功能最多,正如其名字一样,实现的是递归遍历。Demo里给的是EvaluatedExprVisitor,老实说除了RecursiveASTVisitor,其他的Visitor基类网上的文档少的可怜。那我们为什么要用EvaluatedExprVisitor?根据助教的解释:用哪种visitor基类都可以,只要能实现就可以。不同visitor的遍历方式和接口方法不同,本次作业需要考虑不同表达式和语句的情况,EvaluatedExprVisitor对应的接口会更全,比如RecursiveASTVisitor没有侧重到stmt的类型,也没有区分表达式,这会增加上手难度。
在mEnv.init(decl);里,我们注册好几个入口函数,然后找到main函数,遍历main函数里的内容。根据测试用例能看出来需要添加的关键feature有如下几个:
1. 获取表达式的值 1 2 3 4 5 6 7 8 9 10 11 12 13 14 15 16 17 18 19 20 21 22 23 24 25 26 27 28 29 30 31 32 33 34 35 36 37 38 39 40 41 42 43 44 45 46 47 48 49 50 51 52 53 54 55 56 57 58 59 60 int64_t getExprVal (Expr *exp) IgnoreImpCasts ();if (auto decl = dyn_cast <DeclRefExpr>(exp)) {declref (decl);int64_t result = mStack.back ().getStmtVal (decl);return result;else if (auto intLiteral = dyn_cast <IntegerLiteral>(exp)) {getValue ();return result.getSExtValue ();else if (auto charLiteral = dyn_cast <CharacterLiteral>(exp)) {return charLiteral->getValue (); else if (auto unaryExpr = dyn_cast <UnaryOperator>(exp)) { unaryop (unaryExpr);int64_t result = mStack.back ().getStmtVal (unaryExpr);return result;else if (auto binaryExpr = dyn_cast <BinaryOperator>(exp)) {binop (binaryExpr);int64_t result = mStack.back ().getStmtVal (binaryExpr);return result;else if (auto parenExpr = dyn_cast <ParenExpr>(exp)) {return getExprVal (parenExpr->getSubExpr ());else if (auto array = dyn_cast <ArraySubscriptExpr>(exp)) {if (auto *declexpr = dyn_cast <DeclRefExpr>(array->getLHS ()->IgnoreImpCasts ())) {getFoundDecl ();int64_t index = getExprVal (array->getRHS ());if (auto *vardecl = dyn_cast <VarDecl>(decl)) {if (auto array = dyn_cast <ConstantArrayType>(vardecl->getType ().getTypePtr ())) {if (array->getElementType ().getTypePtr ()->isIntegerType ()) {int64_t tmp = mStack.back ().getDeclVal (vardecl);int *p = (int *) tmp;return *(p + index);else if (array->getElementType ().getTypePtr ()->isIntegerType ()) {int64_t tmp = mStack.back ().getDeclVal (vardecl);char *p = (char *) tmp;return *(p + index);else {int64_t tmp = mStack.back ().getDeclVal (vardecl);int64_t **p = (int64_t **) tmp;return (int64_t ) (*(p + index));else if (auto callexpr = dyn_cast <CallExpr>(exp)) {return mStack.back ().getStmtVal (callexpr);else if (auto sizeofexpr = dyn_cast <UnaryExprOrTypeTraitExpr>(exp)) {if (sizeofexpr->getKind () == UETT_SizeOf) {if (sizeofexpr->getArgumentType ()->isIntegerType ()) {return sizeof (int64_t );else if (sizeofexpr->getArgumentType ()->isPointerType ()) {return sizeof (int64_t *);else if (auto castexpr = dyn_cast <CStyleCastExpr>(exp)) {return getExprVal (castexpr->getSubExpr ());errs () << "have not handle this situation \n" ;return 0 ;
2. 函数怎么return 1 2 3 4 5 6 7 8 9 10 11 12 13 14 15 16 extern int GET () extern void * MALLOC (int ) extern void FREE (void *) extern void PRINT (int ) int b=10 ;int f (int x,int y) if (y > 0 ) return x + f (x,y-1 );else return 0 ;int main () int a=2 ;PRINT (f (b,a));
在这个例子里,需要注意的是在return x + f(x,y-1);之后,抽象语法书还是会继续遍历else节点与return 0这个语句,需要再其他的节点的visit语句里加上:
1 if (mEnv->mStack.back ().isReturn ()) return ;

Comments